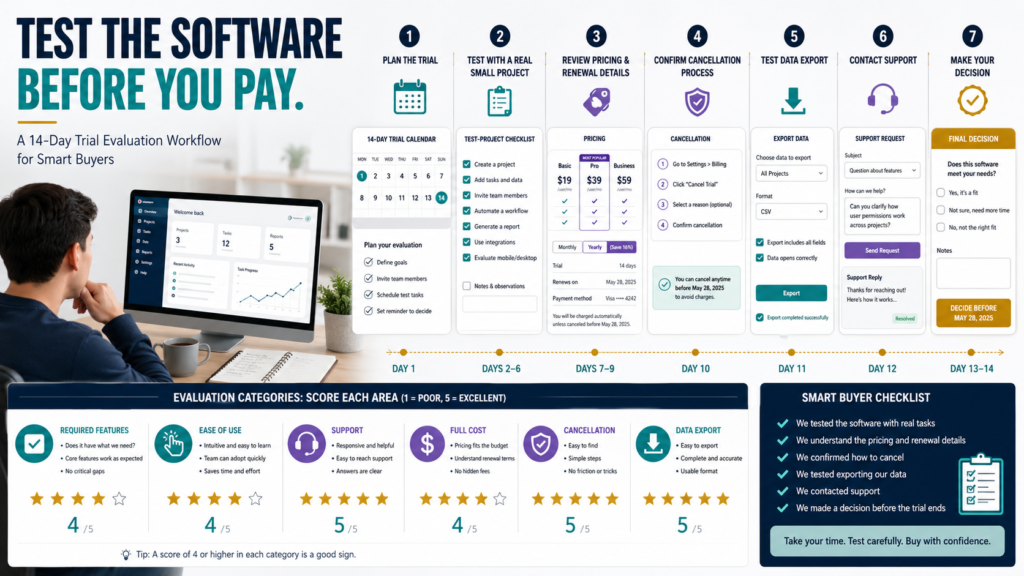
A software free trial should help you answer one question:
Can this product complete the work I need at a cost and level of complexity I am willing to manage?
Many buyers use a trial to explore menus, templates, and impressive demonstrations.
The trial ends before they have tested:
- The complete workflow
- The customer experience
- Integrations
- Support
- Exports
- Cancellation
- The real paid cost
A structured trial evaluation protects you from choosing software based only on its sales page or first impression.
The basic process is:
- Define the task.
- Record the required features.
- Review the paid terms.
- Build one realistic test project.
- Test support and integrations.
- Check cancellation and export options.
- Make the decision before the trial ends.
What a Free Trial Can and Cannot Tell You
A trial can help you evaluate:
- Interface
- Setup
- Workflow
- Templates
- Required skills
- Integrations
- Export options
- Help documentation
- Customer support
- Basic performance
A short trial may not reveal:
- Long-term reliability
- Future price increases
- Service changes
- Large-list performance
- High customer volume
- Long-term support quality
- How frequently you will use the product
Treat the trial as one part of the buying decision.
Step 1: Define the Exact Task
Do not begin with:
I want to test this software.
Write:
I need to create one landing page, connect it to an email list, deliver a checklist, and send three welcome emails.
Or:
I need to upload a PDF product, complete a test payment, provide customer access, and reset the customer password.
The task should represent real business use.
Step 2: Create the Required Feature List
Separate features into three groups.
Required Now
The software must provide them.
Useful Later
They may become valuable but are not necessary today.
Unnecessary
They are impressive but do not support the current workflow.
For an email platform:
Required now:
- Signup form
- Landing page
- Welcome sequence
- Newsletter
- Contact export
Useful later:
- Advanced automation
- Webinars
- Ecommerce segmentation
Unnecessary:
- Features unrelated to the business model
This prevents feature quantity from controlling the decision.
Step 3: Review the Paid Terms First
Before creating an account, record:
- Trial length
- Credit-card requirement
- Paid price
- Billing frequency
- Contact or usage limits
- Upgrade costs
- Renewal date
- Cancellation process
- Refund policy
- Data-export options
Do not wait until the final trial day to learn that the trial converts automatically.
Set a calendar reminder at least two days before the deadline.
Step 4: Use a Separate Test Project
Create a small project that represents real work.
Examples include:
- One lead magnet
- One welcome sequence
- One course lesson
- One digital download
- One product cover
- One short video
- One customer-access area
Do not use an important live project during the first test.
A controlled project allows you to make mistakes without affecting customers.
Step 5: Time the Setup
Record how long it takes to:
- Create the account
- Find the correct tool
- Build the project
- Connect integrations
- Test the result
- Correct problems
The software may save time later, but the learning process still matters.
Do not treat every setup delay as a product failure. Some business processes are naturally complex.
Ask whether the learning time is reasonable for the value provided.
Step 6: Test the Complete Workflow
Do not stop when the project looks correct in the editor.
Complete the process as a customer or visitor.
For an email platform:
- Visit the landing page.
- Submit the form.
- Confirm the subscription when required.
- Open the delivery email.
- Download the resource.
- Receive the follow-up message.
- Unsubscribe.
- Export the contact record.
For a product-delivery platform:
- Complete a test checkout.
- Receive the receipt.
- Receive access instructions.
- Log in.
- Open the product.
- Download the files.
- Reset the password.
- Contact support.
The complete workflow matters more than the editor demonstration.
Step 7: Test the Mobile Experience
Open:
- Landing page
- Checkout
- Emails
- Customer dashboard
- Product files
- Support pages
Check:
- Text size
- Button size
- Forms
- Images
- Navigation
- Downloads
- Login process
Customers may use a phone even when you create everything on a desktop computer.
Step 8: Test Support
Ask one real question.
Evaluate:
- How the support area is found
- Whether documentation answers the question
- Response method
- Clarity
- Helpfulness
- Time required
- Whether the answer fits your plan
Do not create an unnecessary support request merely to challenge the company.
Use a legitimate setup question.
Step 9: Test Exports and Ownership
Determine whether you can export:
- Contacts
- Customer records
- Product files
- Pages
- Images
- Reports
- Videos
- Course content
- Billing information
Ask what happens when the subscription ends.
Can customers still access their purchases?
Can you move the content?
A system becomes more difficult to leave when the business depends on information that cannot be exported.
Step 10: Calculate the Full Cost
Include:
- Monthly subscription
- Annual billing
- Contact limits
- Storage
- Transaction fees
- Additional users
- Required upgrades
- Integrations
- Video hosting
- Domain costs
- Customer fees
Do not evaluate only the advertised starting price.
A low starting plan may become expensive when one required feature sits in a higher tier.
A Practical Trial Example
Imagine a beginner evaluating an email-marketing platform.
The person needs:
- One landing page
- One lead magnet
- Three welcome emails
- One newsletter per week
- Fewer than 500 subscribers
During the trial, the person should:
- Build the landing page.
- Connect the form.
- Upload or link the lead magnet.
- Create the sequence.
- Subscribe with another email address.
- Confirm delivery.
- Send a test newsletter.
- Export the contacts.
- Review the lowest suitable paid plan.
- Decide before the billing deadline.
The buyer does not need to test every advanced feature.
Using Real Products as Trial Examples
A platform such as GetResponse may be evaluated by building a complete email and landing-page workflow during any available trial or test period.
A service such as AWeber may be evaluated through the available starting plan by testing one list, signup process, and welcome sequence.
Review current plan information directly before beginning because trial terms and limits may change.
Create a Trial Scorecard
Rate each category from one to five.
Required Features
Can it complete the current task?
Ease of Use
Can you repeat the process?
Output Quality
Does the finished work meet your standards?
Support
Can you get help?
Integration
Does it connect with existing tools?
Customer Experience
Is the process clear for the user?
Export and Ownership
Can you retrieve important information?
Cost
Does the full price fit the expected value?
Do not allow a high score in one impressive area to hide a failure in a required area.
Decide Before the Trial Ends
Choose:
- Subscribe
- Select a lower plan
- Continue using a free option
- Cancel
- Test another product
- Delay the purchase
Record the reason.
Example:
Cancel because the platform works well, but the required automation feature is only available in a plan that exceeds the current budget.
This does not mean the product is poor. It means it does not fit the present need.
Common Free-Trial Mistakes
Exploring Instead of Testing
Build the real workflow.
Forgetting the Deadline
Set reminders.
Testing Features You Do Not Need
Focus on required tasks.
Ignoring the Paid Price
Review the long-term cost before setup.
Failing to Cancel Properly
Follow the official cancellation process and save confirmation.
Leaving Important Content in the Account
Export what you need before access ends.
Software Free-Trial Checklist
Trial Start Date:
[Date]
Trial End Date:
[Date]
Billing Starts:
[Date]
Required Task:
[Task]
Required Features:
[Features]
Paid Price:
[Price]
Required Upgrade:
[Upgrade]
Test Project:
[Project]
Mobile Test:
[Completed or not]
Support Test:
[Result]
Export Test:
[Result]
Cancellation Method:
[Method]
Final Decision:
[Subscribe, cancel, compare, or delay]
Conclusion
A software free trial should test the complete business workflow rather than provide a temporary tour of the dashboard.
Define the task, review the paid terms, create one realistic project, test the customer experience, contact support, confirm exports, and decide before billing begins.
Create the evaluation checklist before starting your next trial so the deadline does not make the decision for you.